Cost $ - Stencils are free, tools you might have, pumpkin $2-$10
Value $$$ - Hours of quality time with your kids for under $10
Fun !! - Picking a stencil is fun, the finished product is fun, the in-between can be challenging and frustrating
Time ## - Simple designs can be an hour, more complex 3+hours
Age 8+ if they are helping - sharp tools mean close supervision is required
Stuff you need:
Pumpkin - bigger is better. It is much easier to carve a bigger detailed image than a little tiny one. Make no mistake, it is a time consuming process, but you are less likely to slip and either cut yourself or cut off part of the pumpkin skin you wanted to keep. Ideally, you want a pumpkin big enough so that width of your small cut lines are no smaller than the width of your scraping tool. Pumpkins often have one flatter side where they lay in the field. This can hold a stencil very nicely. Check for cosmetic stuff if you care about nice stems and how flat it sits.
Where to find a stencil - I get a lot of hits from people looking for stencils. I used to spend hours of google-fu looking for "free pumpkin stencils" and largely got crappy simple designs or links to pay sites. There are actually millions of free pumpkin stencils out there if you change your keywords! The trick is to search for "[WhatIWantToCarve] colouring pages" (or coloring for my American friends). Refine by choosing black and white images and you should have ample choices. This year, I chose Tinkerbell for one of my pumpkins. I searched "
tinkerbell colouring page" on google images and picked the third one. Try to find a square or landscaped image. Tall narrow stencils don't fit well on pumpkins, so I went with Tinkerbell sitting down.
Carving Tools - I have a craft kit I picked up years ago. I think it is supposed to be for carving wood. I use only 3 tools from it: a scalpel-like blade, a chisel-like gouger/scraper, and a needle-like poker. You want a gouger/scraper that has a flat blade, not the ones that are curved. The poker is reversible - one end is pointy, the other flat - and both come in handy. I've heard of people using dremels. I tried it one year but found the skin would tear and make jagged lines. The scalpel gives you a nice clean edge.
Other Stuff - Kitchen knife, scissors, a sharpie, clear packing tape, sharp spoon (an oxymoron?), newspaper, bowl for pumpkin guts.
How to do it:
1. Prep your pumpkin - not going to go into much detail since you should already know how to do that. Lay down some newspaper to make cleanup easier. I use a sharpie to draw a lid, cut it out with a kitchen knife. Scoop the gunk, keep the seeds to roast up a nice snack. This is where the sharp spoon comes it. Scrape the inside of the pumpkin where you are going to carve the outside. You want to get into the drier noodle-like yellow of the pumpkin (left in pic) and not just the orange slimy stuff (right in pic). This thins the wall of the pumpkin to allow light to shine through better. You won't have to carve as deep on the outside.
2. Prep your stencil - you've picked the stencil, use the computer to resize it to best fit your pumpkin. I use the generic Microsoft Photo Editor's resize tool. You can also play with size on the print preview screen of many programs.
Be anal-retentive like me and measure the pumpkin, or just print until you get one that works. Remember bigger is better and easier. Print two copies - one to use on the pumpkin, one for reference after you've cut the first one into little bits. The simplest way to carve a colouring page is to just cut thin lines along either side of all the black lines - an 'outline'. Check out Tinkerbell's shoes and the left side of her dress in the photos further down for an example. You can do the whole image like this.
If you have good spatial recognition skills, you can do a nicer but more complicated (and more error prone) three colour carving. You have orange skin, yellow carved skin, and bright yellow/white hole. The 2nd copy stencil comes in handy here for shading in what you're going to do. I decided to skin carve the wings and skin, and outline the dress, shoes, and hair.
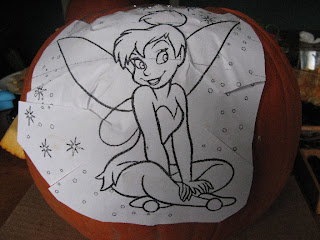
3. Attach stencil to pumpkin - Cut the excess paper around your stencil. You're putting something flat on something rounded (unless you found a pumpkin with a perfect flat side), so make the little cuts shown in the picture to help form it against the pumpkin. Position the stencil, tape the top and bottom to the pumpkin with clear packing tape. Smooth the rest of it flat to the pumpkin. Tape like mad. The whole stencil needs to be covered with bands of tape. The paper will get wet and soggy when you start cutting, but the tape will hold it together and in place.
4. Start cutting - use your scalpel and start cutting. I hold it like a pen. You need to make the cuts as deep as possible, absolutely perpendicular to the pumpkin, particularly wherever there is fine detail. Cut a single line where you will scrape off the pumpkin skin (wings, skin) and a double line to outline where you are leaving pumpkin skin (hair, dress, shoes, between two skin scraped areas). Spatial recognition helps a lot here. Make sure your lines join up or the skin will tear at the next step. Cut out the parts of the stencil one by one. If the paper comes off easily, the lines meet up.
5. Start carving - Peel off the remnants of the stencil and tape. You will be able to see the faint lines where you made your cuts. With the help of your 2nd copy of the stencil, start gouging the skin off. Note that right off the bat, I messed up my plan! I had wanted to outline the hair but got distracted and started gouging it instead. Oops. At least it was easily fixed by adding a double line and changing to an outline. The shoulders are a good example of what I mean by double line. I basically cut on either side of the colouring page line so I would leave that strip of pumpkin skin. Same technique but in reverse for the shoes outline.
You're using the gouge/scraper like a chisel. Chisel/gouge (gently) towards your scalpel cuts. A slight twist of the tool and a piece of skin will break off. Because you cut your lines so deep, it will be a nice clean break where you want a nice clean line. Where there isn't room to get the gouge in - like between Tinkerbell's eyebrow and hairline, use the scalpel to cut away the skin instead. Be very careful around tiny parts like this - the eyebrow/eyes/mouth - it is very easy to slip and cut them off. Try to leave them to last so they are less likely to break off while you're handling the pumpkin while scraping elsewhere.
6. Fudge Details
Often your stencil will have details too small to be able to carve. Perfect example is Tinkerbell's fingers or the pom pom things on her shoes. You can't get that level of detail, so either remove (the pom poms) or simplify (the fingers become a mitten shape)
 7. Start scraping
 Now its time to light the pumpkin. Candles don't do it. I usually use a trouble light or temporarily wire up a bulb and socket. Only use a compact fluorescent bulb. The heat of an incandescent will dry out the pumpkin and the light won't shine through as well. The light will show your chisel marks. Flip the chisel tool over, hold it like a pen, and start scraping the marks away. It is possible to vary the depth of the scraping to get some subtle colour differences. Scrap the wings deeper to make them brighter for example. This is also where you need the poker. The flat end is small enough to fit nicely for scraping around outlines like the shoes. The pointy end can get your third colour by poking all the way through the pumpkin, which is a good accent for the eyes.
8. Finished
There are a number of little mistakes, but don't worry about it. All the kids who come to your door (in my case 3-5) will recognize Tinkerbell and be impressed. Photo shows the mostly finished pumpkin. You can see where I've started accenting the hair, but I still need to scrape the wings more. The big problem with skin carving pumpkins is that they dry out and you don't get the same cool translucent look once they do. I'm going to leave finishing it until Sunday when I'll scrape off the dry layer. Ideally you want to carve your pumpkin on the 31st. Any sooner than that, try covering the carving with wet paper towel to hold moisture in.
9. More Pumpkins
This year I'm also doing a Transformers pumpkin with the Autobots and Decepticons logos. Much, much easier than Tinkerbell since it is mostly straight lines and not much detail.
Here are the final results for my Tinkerbell pumpkin and transformers pumpkin
10. Other examples
Pumpkins 2011: Batman Pumpkin, Batman Symbol
Pumpkins 2010: Tinkerbell Pumpkin, Transformers Pumpkin with Autobot and Decepticon logos
Pumpkins 2009: Scooby Doo and Shaggy Pumpkin, Mystery Machine Pumpkin, Yoda Pumpkin, Boba Fett Pumpkin
Pumpkins 2008: Ernie and Bert Pumpkin, Soccer Ball Pumpkin
.


